· 11 min read

This sixth iteration of the cloud-native project, https://github.com/dfberry/cloud-native-todo, added the client UI to the monorepo.

YouTube demo

  1. Use Vite React to create basic project structure.
  2. Add React page and components for Todo: form, list, item.
  3. Add Tests for components.
  4. Add API integration.

Reminder: A quick reminder that this project is using an in-memory DB at this point in the API. Each step of the way is meant to bootstrap the next step for speed instead of complete build out. This step is focusing on a bare-bones UI that interacts with the API.

Front-end framework choices and ChatGPT

This iteration is a proof of concept (POC) that can grow, as opposed to being thrown away. With that in mind, I picked Vite React as the frontend framework. I'm comfortable with React and I like the Vite toolchain.

In this day and age of ChatGPT everywhere, does it matter what framework you pick for a POC? This is up to you. Whatever answers or code your AI partner (such as ChatGPT) gives you, you still need to be able to integrate it and debug it. I suggest you pick something that you work with as though ChatGPT weren't available. If your team knows a different stack, and that stack has any duration (not built in the last year), go with that stack.

I considered Next.js, plain React, Vite React, and create-react-app (CRA). The POC needs velocity but not at the risk of the velocity or chaos of the underlying stack:

  • Next.js is a great framework but has its own ideas about the cloud.
  • Plain React means building out my own toolchain -- a waste of time compared to Next, Vite, CRA and other stacks that provide that.
  • Create React App has had some bumps in the road the last few years. Reminds me of the Angular 2,3,4,5 releases which is why I don't use Angular anymore.
  • Vite has been dependable in the last few projects so I'm sticking with that. ChatGPT answers enough of the Vite config and ViTest questions so that's a plus.

Creating the basic Vite React app

Vite has a quick ability to scaffold out the app with the CLI for a variety of front-end frameworks including React, Vue, and Svelte, and Electron. I chose TypeScript and SWC.

npm create vite@latest

This gives a basic runnable app with ESLint already configured.

{
"name": "vite-project",
"private": true,
"version": "0.0.0",
"type": "module",
"scripts": {
"dev": "vite",
"build": "tsc && vite build",
"lint": "eslint . --ext ts,tsx --report-unused-disable-directives --max-warnings 0",
"preview": "vite preview"
},
"dependencies": {
"react": "^18.2.0",
"react-dom": "^18.2.0"
},
"devDependencies": {
"@types/react": "^18.2.43",
"@types/react-dom": "^18.2.17",
"@typescript-eslint/eslint-plugin": "^6.14.0",
"@typescript-eslint/parser": "^6.14.0",
"@vitejs/plugin-react-swc": "^3.5.0",
"eslint": "^8.55.0",
"eslint-plugin-react-hooks": "^4.6.0",
"eslint-plugin-react-refresh": "^0.4.5",
"typescript": "^5.2.2",
"vite": "^5.0.8"
}
}

The vite.config.ts is where all the configuration goes.

Add environment variable for API

Create a .env file and add an environment variable prefixed with VITE_ for the API URL such as http://localhost:3000. When the client is deployed to the host, this URL will need to be changes and the front-end client build with the correct cloud URL. This URL is used later to build out the full API URL to fetch results:

const ENV_URL = import.meta.env.VITE_API_URL || 'http://localhost:3000';
if(!ENV_URL) {
console.log('VITE_API_URL is not defined');
}

export const API_URL = `${ENV_URL}/todo`;

For this POC, a simple API service looks like:

import { NewTodo } from './models';

const ENV_URL = import.meta.env.VITE_API_URL || 'http://localhost:3000';
if(!ENV_URL) {
console.log('VITE_API_URL is not defined');
}

export const API_URL = `${ENV_URL}/todo`;

export const addTodo = async (newTodo: NewTodo): Promise<Response> => {
return await fetch(API_URL, {
method: 'POST',
headers: {
'Content-Type': 'application/json',
},
body: JSON.stringify(newTodo),
});
};
export const deleteTodo = async (id: number): Promise<Response> => {
return await fetch(`${API_URL}/${id}`, {
method: 'DELETE',
});
};

Clean up the app

The main boilerplate for the Vite React app has a few things going on but none of which this POC needs at this point.

import { useState } from 'react'
import reactLogo from './assets/react.svg'
import viteLogo from '/vite.svg'
import './App.css'

function App() {
const [count, setCount] = useState(0)

return (
<>
<div>
<a href="https://vitejs.dev" target="_blank">
<img src={viteLogo} className="logo" alt="Vite logo" />
</a>
<a href="https://react.dev" target="_blank">
<img src={reactLogo} className="logo react" alt="React logo" />
</a>
</div>
<h1>Vite + React</h1>
<div className="card">
<button onClick={() => setCount((count) => count + 1)}>
count is {count}
</button>
<p>
Edit <code>src/App.tsx</code> and save to test HMR
</p>
</div>
<p className="read-the-docs">
Click on the Vite and React logos to learn more
</p>
</>
)
}

export default App

Replace the contents with a pared-down component:

import './App.css'

import Todo from './todo'

function App() {

return (
<>
<Todo />
</>
)
}

export default App

Add the page, form, list, and item

  1. To keep the client UI clean and clear, create a new subfolder for everything for the Todo named todo.

  2. Create the main todo page, index.tsx, which handled the events, API call, and child rerenders.

    import { useState } from 'react';
    import useSWR, { mutate } from 'swr';
    import TodoForm from './components/form';
    import List from './components/list';
    import { NewTodo, Todo } from './models';
    import { API_URL, addTodo, deleteTodo } from './service';
    import { fetcher } from './api';

    export default function Todo() {
    const [requestError, setRequestError] = useState('');
    const { data, error, isLoading } = useSWR(API_URL, fetcher)

    async function handleSubmit(newTodoItem: NewTodo) {
    setRequestError('');

    try {
    const result = await addTodo(newTodoItem);

    if (!result.ok) throw new Error(`result: ${result.status} ${result.statusText}`);
    const savedTodo = await result.json();
    mutate(API_URL, [...data, savedTodo], false);

    } catch (error: unknown) {
    setRequestError(String(error));
    }
    }

    async function handleDelete(id: number) {
    setRequestError('');
    try {
    const result = await deleteTodo(id);
    if (!result.ok) throw new Error(`result: ${result.status} ${result.statusText}`);
    mutate(API_URL, data.filter((todo: Todo) => todo.id !== id), false);
    } catch (error: unknown) {
    setRequestError(String(error));
    }
    }

    if (error && requestError) return <div>failed to load {error ? JSON.stringify(error) : requestError}</div>
    if (isLoading) return <div>loading...{JSON.stringify(isLoading)}</div>

    return (
    <div>
    <TodoForm onSubmit={handleSubmit} requestError={requestError} />
    <div>
    <List todos={data} onDelete={handleDelete} />
    </div>
    </div>
    )
    }
  3. Create the listing, components/list.tsx, to display the 3 default todos.

    import { Todo } from '../models';
    import Item from './item';

    export type { Todo };

    interface Props {
    todos: Todo[];
    onDelete: (id: number) => void;
    }

    export default function List({ todos, onDelete }: Props) {
    return (

    todos.length > 0 && (
    <table style={{ width: '100%', marginTop: '20px'}} data-testid="list">
    <thead>
    <tr>
    <th >ID</th>
    <th >Title</th>
    <th >Delete</th>
    </tr>
    </thead>
    <tbody>
    {todos.map((todo) => (
    <Item
    key={todo.id}
    todo={todo}
    onDelete={onDelete}
    />
    ))}
    </tbody>
    </table>
    )
    )
    }
  4. Add the Item, components/item.tsx, to display each item.

    import { Todo } from '../models';

    export type { Todo };

    export interface ItemProps {
    todo: Todo;
    onDelete: (id: number) => void;
    }

    export default function Item({ todo, onDelete }: ItemProps) {

    return (
    <tr data-testid="item-row">
    <td data-testid="item-id">{todo.id}</td>
    <td data-testid="item-title">{todo.title}</td>
    <td data-testid="item-delete">
    <button onClick={() => onDelete(todo.id)} >X</button>
    </td>
    </tr>
    );
    }

    Notice the attributes for testing, named data_testid are included already.

  5. Add the Form, components/form.tsx, to capture a new todo item.

    import { FormEvent, KeyboardEvent, ChangeEvent, useRef, useState } from 'react';
    import { NewTodo } from '../models';

    export type { NewTodo };

    interface Props {
    onSubmit: (newTodoItem: NewTodo) => void;
    requestError?: string;
    }
    export default function TodoForm({ onSubmit, requestError }: Props) {
    const formRef = useRef<HTMLFormElement>(null);
    const [newTodo, setNewTodo] = useState<NewTodo>({ title: '' });

    const handleSubmit = (event: FormEvent<HTMLFormElement>) => {
    event.preventDefault();
    const formData = new FormData(event.currentTarget);
    const title = formData.get('title')?.toString() || null;

    if (title !== null) {

    onSubmit({
    title
    });
    if (formRef.current) {
    formRef.current.reset();
    }
    // Reset the newTodo state
    setNewTodo({ title: '' });
    }
    }

    const handleKeyDown = (event: KeyboardEvent<HTMLInputElement>) => {
    if (event.key === 'Enter') {
    if (formRef.current) {
    formRef.current.dispatchEvent(new Event('submit', { cancelable: true }));
    }
    }
    };
    const handleInputChange = (event: ChangeEvent<HTMLInputElement>) => {
    setNewTodo({
    title: event.target.value,
    });
    };
    return (
    <div >
    <div>
    <h1 >What do you have to do?</h1>
    </div>
    <form ref={formRef} onSubmit={handleSubmit} data-testid="todo-form">
    <div >
    <input
    id="todoTitle"
    name="title"
    type="text"
    value={newTodo.title}
    placeholder="Title"
    onChange={handleInputChange}
    onKeyDown={handleKeyDown}
    data-testid="todo-form-input-title"
    />
    </div>
    {requestError && (
    <div data-testid="todo-error">
    {requestError}
    </div>
    )}
    <button type="submit" disabled={!newTodo.title} data-testid="todo-button">Add Todo</button>
    </form>
    </div>
    );
    }
  6. Add any dependency code such as the API service and its API fetcher for SWR, and the TypeScript models for a new todo and an existing todo.

  7. Start the API and the client UI to use the form.

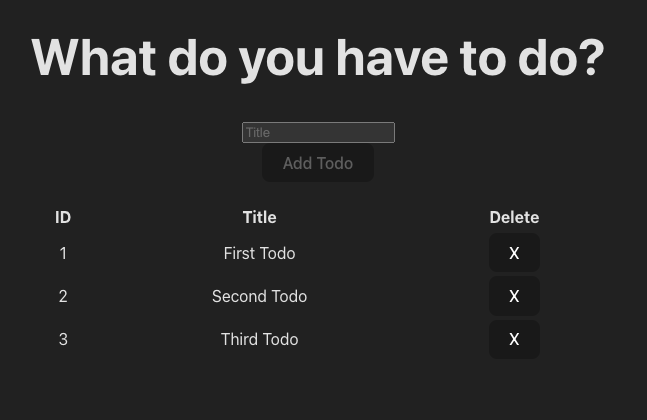
    Browser todo app

    The form accepts a title to add a new todo, or deletes a todo using the X on each item's room.

Note: This UI isn't styled and the little style that is there is mostly defaults. If you aren't comfortable with CSS or style libraries, use ChatGPT and GitHub CoPilot for this.

Add ViTest UI tests

Now that the bare bones proof of concept is working, add the UI tests to validate it. This is important so that any future changes to the app don't break existing functionality.

The tests cover the following simple cases:

  • renders form without error
  • renders form with error
  • renders button disabled
  • renders button enabled
  • accepts input text
  • submit form by button
  • submit form by keypress enter
  • item component deletes item
  • renders List with todos
  • does not render List when todos is empty
  1. Add ViTest following the instructions for that site and a few other packages for testing UI with ViTest. Refer to the package.json for the complete list.

    npm install -D vitest @vitest/ui
  2. Create the vitest.config.ts file for configurations:

    import path from 'node:path';
    import { defineConfig, defaultExclude } from 'vitest/config';
    import configuration from './vite.config';

    const config = {
    ...configuration,
    test: {
    reporters: ['json', 'default'],
    outputFile: { json: "./test-output/test-results.json" },
    globals: true,
    setupFiles: path.resolve(__dirname, 'test/setup.ts'),
    exclude: [...defaultExclude],
    environmentMatchGlobs: [
    ['**/*.test.tsx', 'jsdom'],
    ['**/*.component.test.ts', 'jsdom'],
    ]
    },
    };

    export default defineConfig(config);

    The outputFile keeps the output files out of the way. The setupFiles also keep the test setup files tucked away.

  3. The hardest part about getting these tests to work was the TypeScript types for the testing library user events such as await user.type(input, title). The test setup and utility files helped with that. If you run into this, make sure to restart your TS Server in Visual Studio Code as well.

    // test/setup.ts
    import '@testing-library/jest-dom/vitest';
// test/utilities.ts
import type { ReactElement } from 'react';
import { render as renderComponent } from '@testing-library/react';
import userEvent from '@testing-library/user-event';

type RenderOptions = Parameters<typeof renderComponent>[1];

export * from '@testing-library/react';

export const render = (ui: ReactElement, options?: RenderOptions) => {
return {
...renderComponent(ui, options),
user: userEvent.setup(),
};
};
```
  1. Then the User event test, such as the following, builds and runs.

    test('submit form by keypress enter', async () => {

    // new title
    const title = 'Test Todo';

    // mock add function
    const mockAdd = vi.fn();

    // render the component
    const { user, getByTestId } = render(<TodoForm onSubmit={mockAdd}/>);

    // Fill in the input
    const input = getByTestId('todo-form-input-title');
    await user.type(input, title);

    // submit form by keypress
    await user.type(input, '{enter}');

    // todo submitted to parent via onSubmit
    expect(mockAdd).toHaveBeenCalledTimes(1);
    expect(mockAdd).toHaveBeenCalledWith({ title });
    })
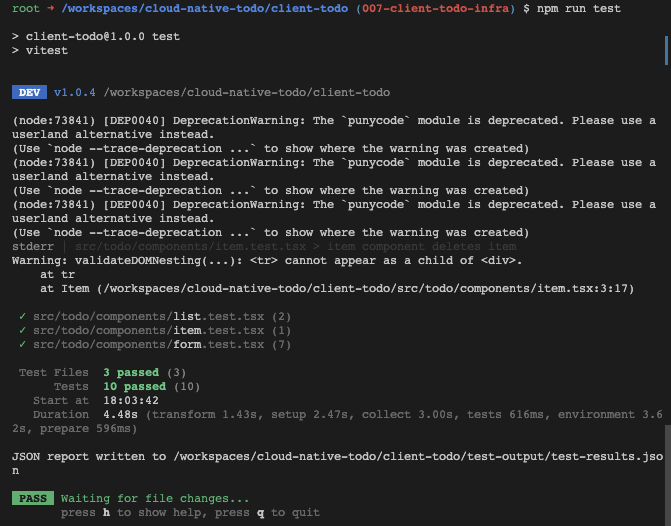
  2. Run the test with npm run test and see the results:

    Visual Studio Code terminal running tests

Where was CoPilot in this iteration?

Where did CoPilot succeed?

CoPilot came in handy in some of the places that I'm happy to let to handle:

  • Quick CSS tweaks - it's much faster to play with CSS when CoPilot is generating styles over and over.
  • Config files - I was surprised by how much CoPilot helped with Vite and ViTest.
  • Components - it wrote most of the component code, I asked for refactors and it provided those as well.
  • Tests - it wrote most of the UI tests for me in seconds.

Where did CoPilot fail?

The tricky parts of integration, especially across tools, dependencies, and versions are still tricky. I spent the most time on the TypeScript issue with the testing library for user events. The fix came from a StackOverflow post which I had to look for. Considering all the layers involved and the time already saved in other places I used CoPilot and ChatGPT, that seems like net positive time savings for a proof of concept.

Where to next?

Now that the UI code is written and works locally, the project needs a container for the UI, and it needs to provision the UI resources for that container in the cloud. The client container needs to talk to the API container correctly. Fun stuff!

· 6 min read

This fifth iteration of the cloud-native project, https://github.com/dfberry/cloud-native-todo, added the changes to deploy from the GitHub repository:

YouTube demo

  1. Add azure-dev.yml GitHub action to deploy from source code
  2. Run azd pipeline config
    • push action to repo
    • create Azure service principal with appropriate cloud permissions
    • create GitHub variables to connect to Azure service principal

Setup

In the fourth iteration, the project added the infrastructure as code (IaC), created with Azure Developer CLI with azd init. This created the ./azure.yml file and the ./infra folder. Using the infrastructure, the project was deployed with azd up from the local development environment (my local computer). That isn't sustainable or desirable. Let's change that so deployment happens from the source code repository.

Add azure-dev.yml GitHub action to deploy from source repository

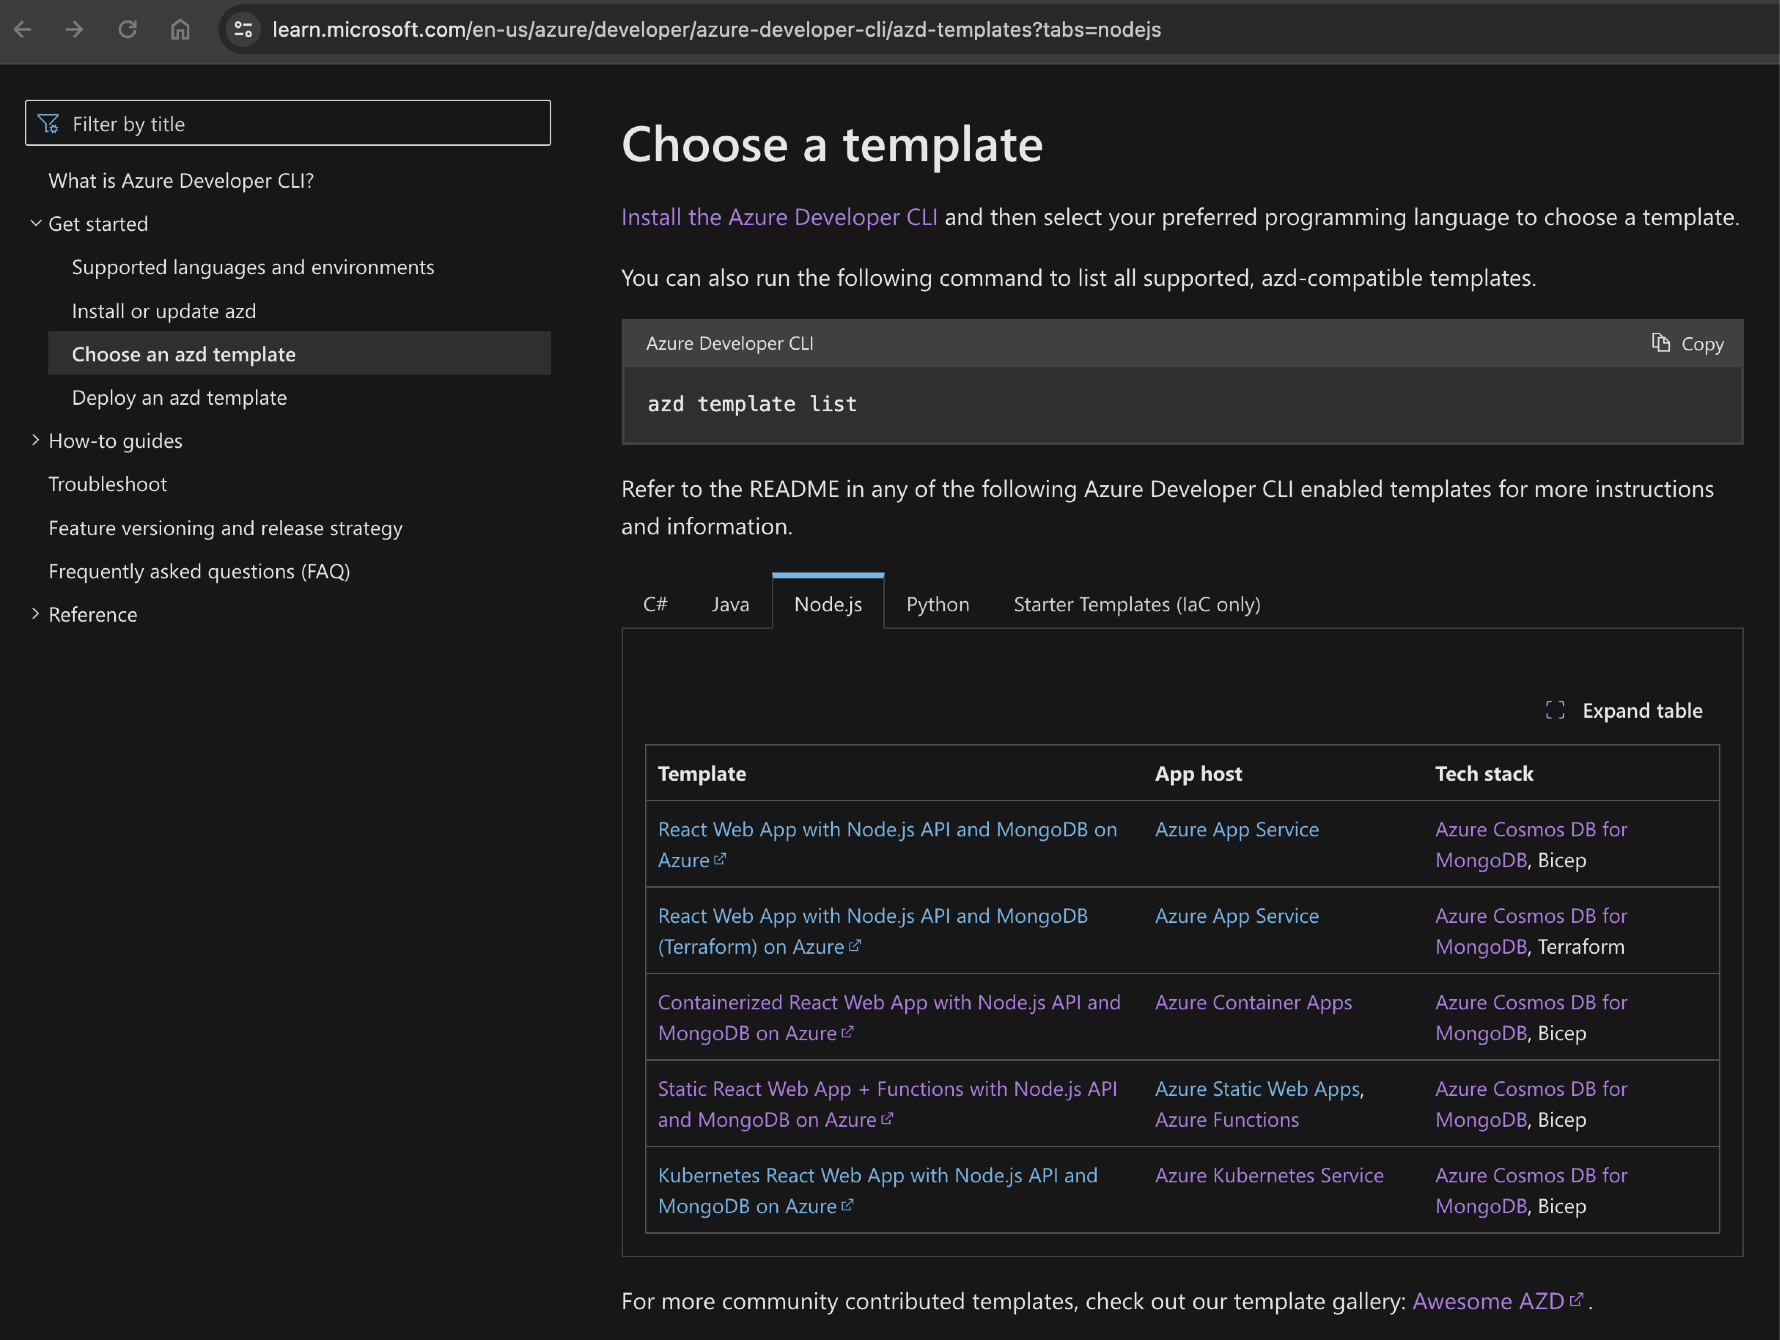
The easiest way to find the correct azure-dev.yml is to use the official documentation to find the template closest to your deployed resources and sample.

Browser screenshot of the Azure Developer CLI template table by language and host

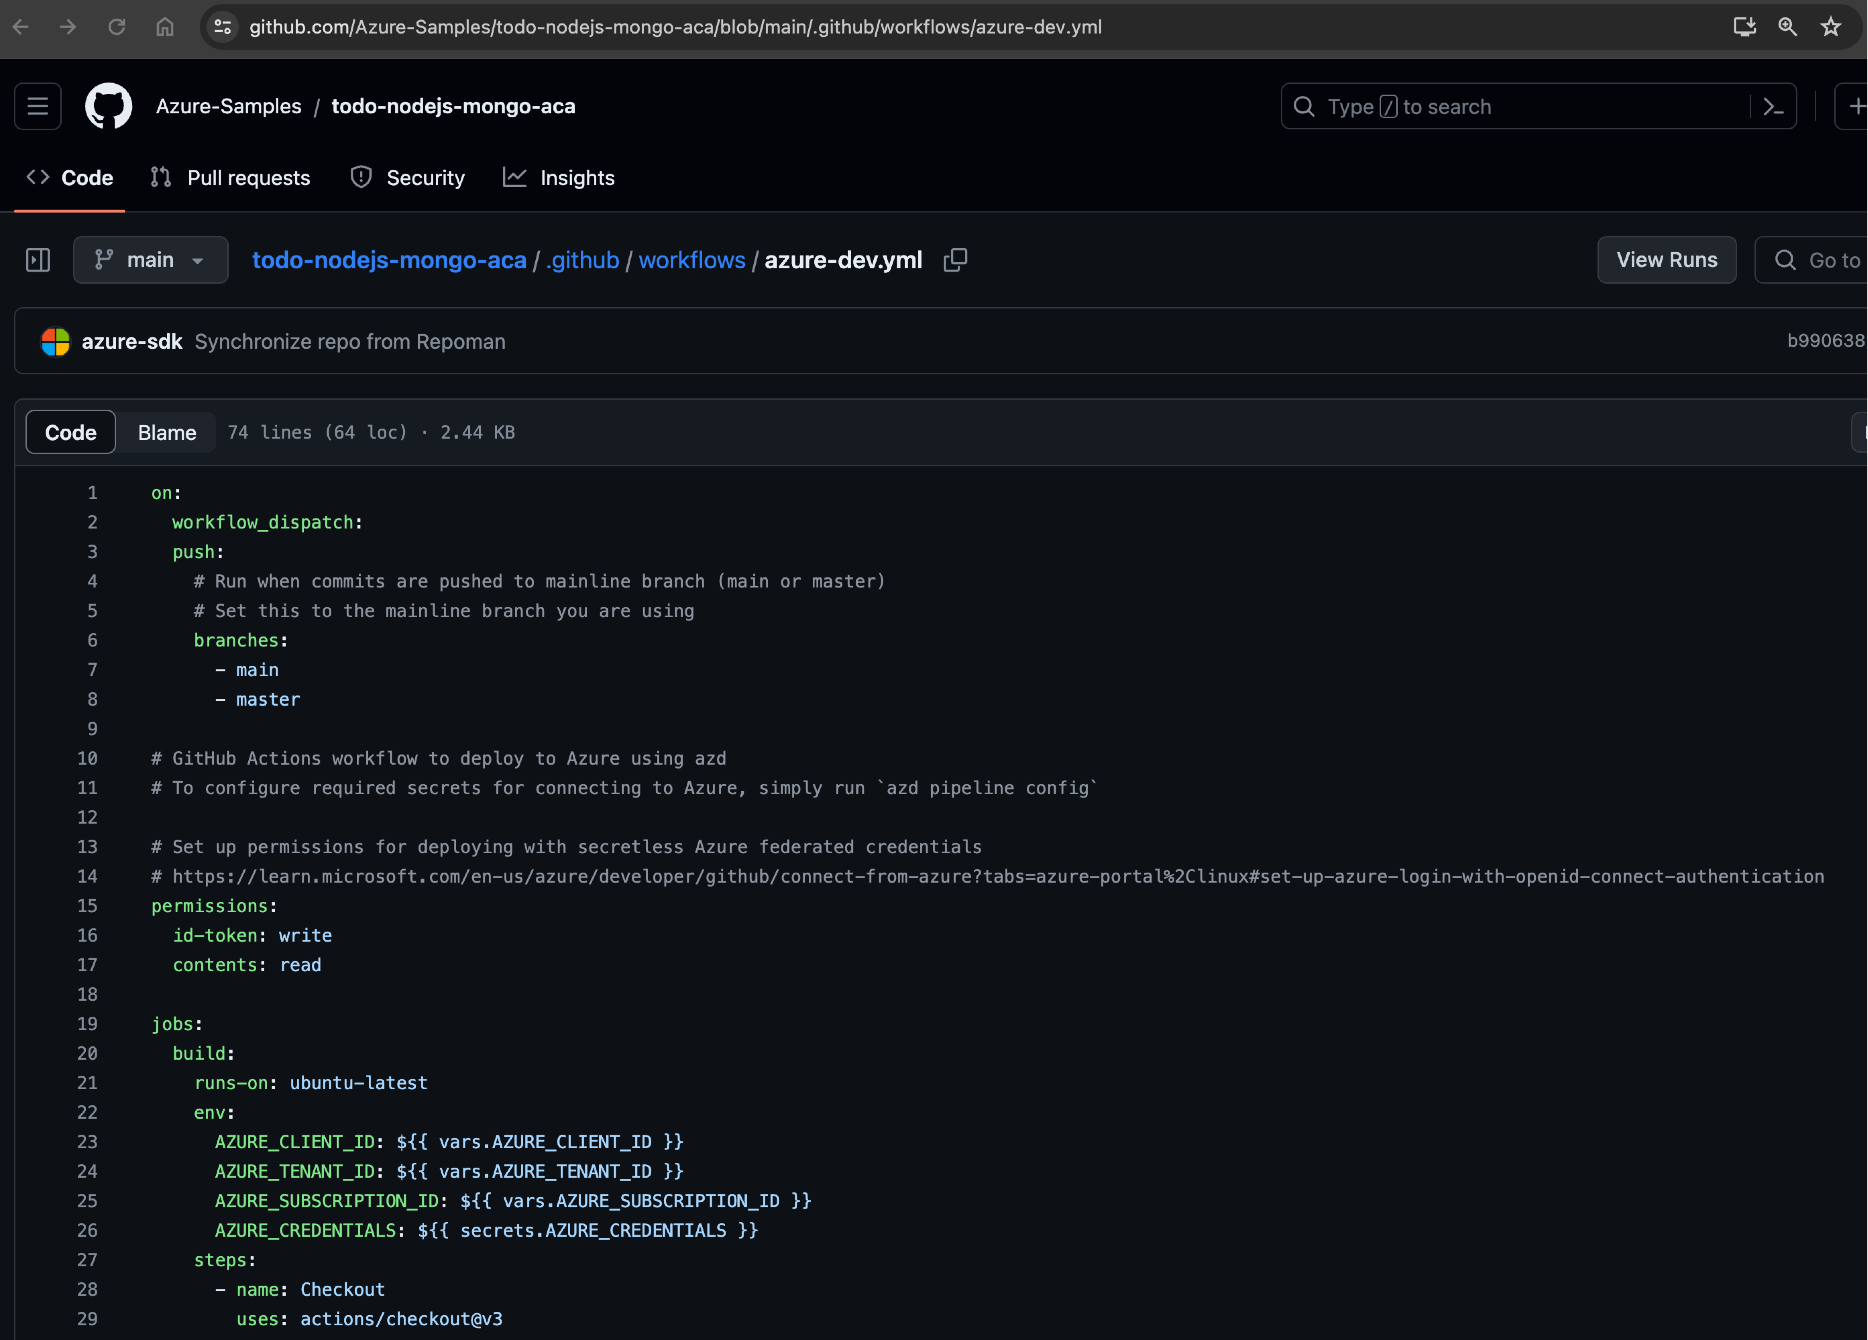
  1. Copy the contents of the template's azure-dev.yml file from the sample repository into your own source control in the ./github/workflows/azure-dev.yml file.

    Browser screenshot of template source code azure-dev.yml

  2. Add the name to the top of the file if one isn't there, such as name: AZD Deploy. This helps distinguish between other actions you have the in repository.

    name: AZD Deploy

    on:
    workflow_dispatch:
    push:
    # Run when commits are pushed to mainline branch (main or master)
    # Set this to the mainline branch you are using
    branches:
    - main
    - master
  3. Make sure the azure-dev.yml also has the workflow_dispatch as one of the on settings. This allows you to deploy manually from GitHub.

Run azd pipeline config to create deployment from source repository

  1. Switch to a branch you intend to be used for deployment such as main or dev. The current branch name is used to create the federated credentials.

  2. Run azd pipeline config

  3. If asked, log into your source control.

  4. When the process is complete, copy the service principal name and id. Mine looked something like:

    az-dev-12-04-2023-18-11-29 (abc2c40c-b547-4dca-b591-1a4590963066)

    When you need to add new configurations, you'll need to know either the name or ID to find it in the Microsoft Entra ID in the Azure portal.

Service principal for secure identity

The process created your service principal which is the identity used to deploy securely from GitHub to Azure. If you search for service principal in the Azure portal, it takes you Enterprise app. Don't go there. An Enterprise app is meant for other people, like customers, to log in. That's a different kind of thing. When you want to find your deployment service principal, search for Microsoft Entra ID.

  1. Go ahead ... find your service principal in the Azure portal by searching for Microsoft Entra ID. The service principals are listed under the Manage -> App registrations -> All applications.

  2. Select your service principal. This takes you to the Default Directory | App registrations.

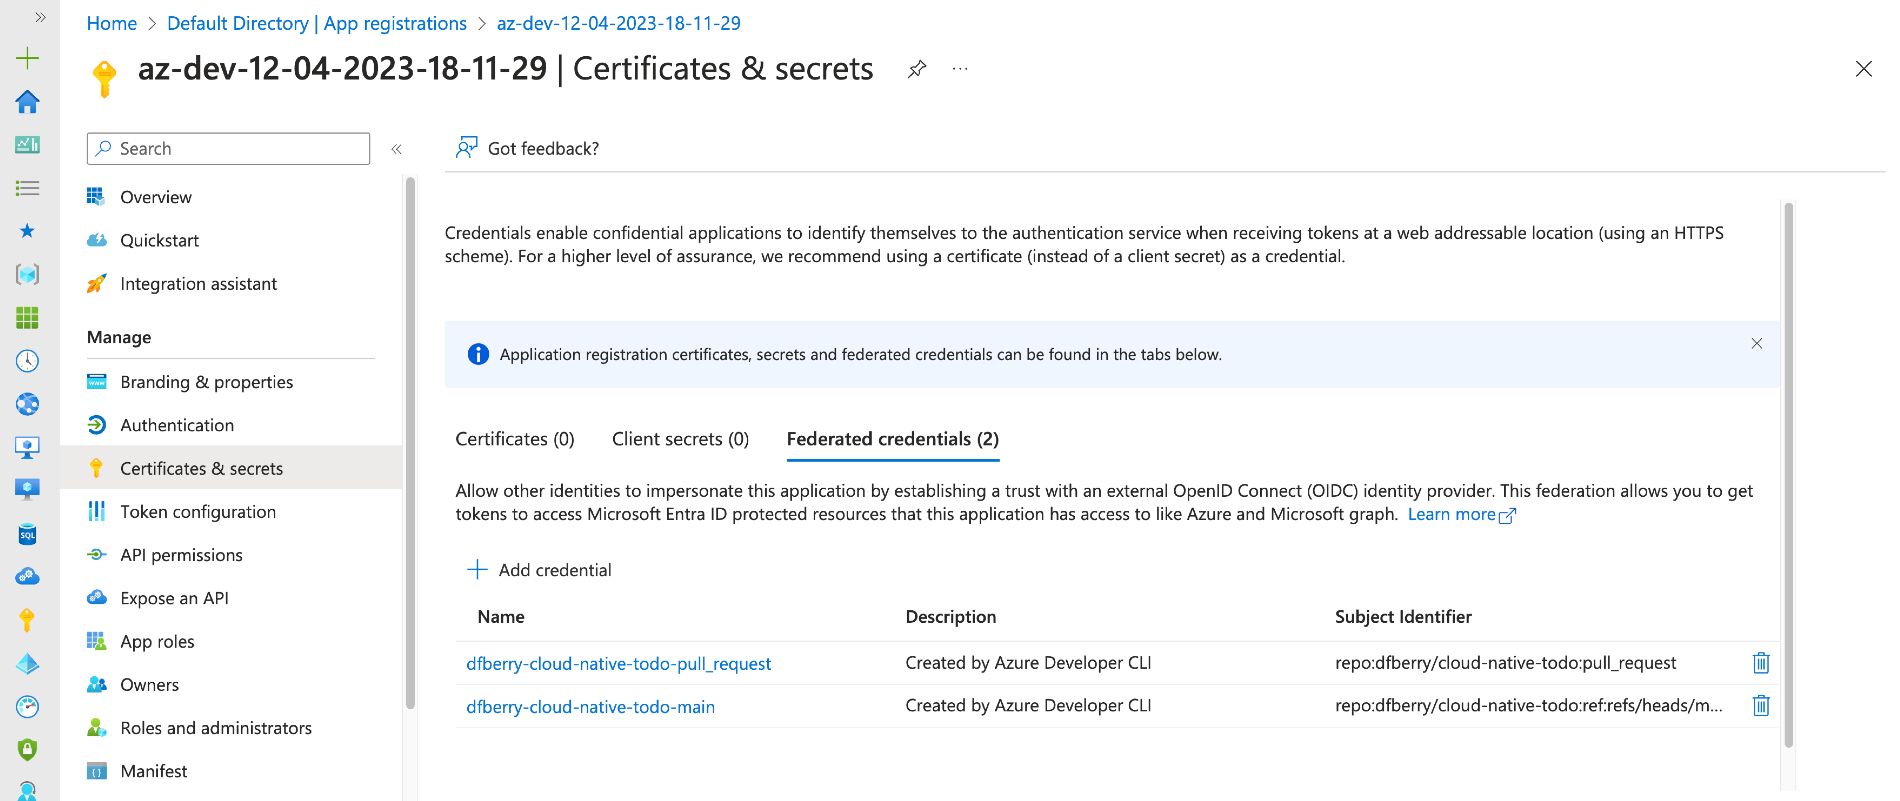
  3. On the Manage -> Certificates & secrets, view the federated credentials.

    Browser screenshot of federated credentials

  4. On the Manage -> Roles and Administrators, view the Cloud Application Administrator.

When you want to remove this service principal, you can come back to the portal, or use Azure CLI's az ad sp delete --id <service-principal-id>

GitHub action variables to use service principal

The process added the service principal information to your GitHub repository as action variables.

  1. Open your GitHub repository in a browser and go to Settings.

  2. Select Security -> Secrets and variable -> Actions.

  3. Select variables to see the service principal variables.

    ![Browser screenshot of GitHub repository showing settings page with secure action variables table which lists the values necessary to deploy to Azure securely.]

  4. Take a look at the actions run as part of the push from the process. The Build/Test action ran successfully when AZD pushed the new pipeline file in commit 24f78f4. Look for the actions that run based on that commit.

    Browser screenshot of GitHub actions run with the commit

    Verify that the action ran successfully. Since this was the only change, the application should still have the 1.0.1 version number in the response from a root request.

When you want to remove these, you can come back to your repo's settings.

Test a deployment from source repository to Azure with Azure Developer CLI

To test the deployment, make a change and push to the repository. This can be in a branch you merge back into the default branch, or you can stay on the default branch to make the change and push. The important thing is that a push is made to the default branch to run the GitHub action.

In this project, a simple change to the API version in the ./api-todo/package.json's version property is enough of a change. And this change is reflected in the home route and the returned headers from an API call.

  1. Change the version from 1.0.1 to 1.0.2.
  2. Push the change to main.

Verify deployment from source repository to Azure with Azure Developer CLI

  1. Open the repository's actions panel to see the action to deploy complete.

    Browser screenshot of actions run from version change and push

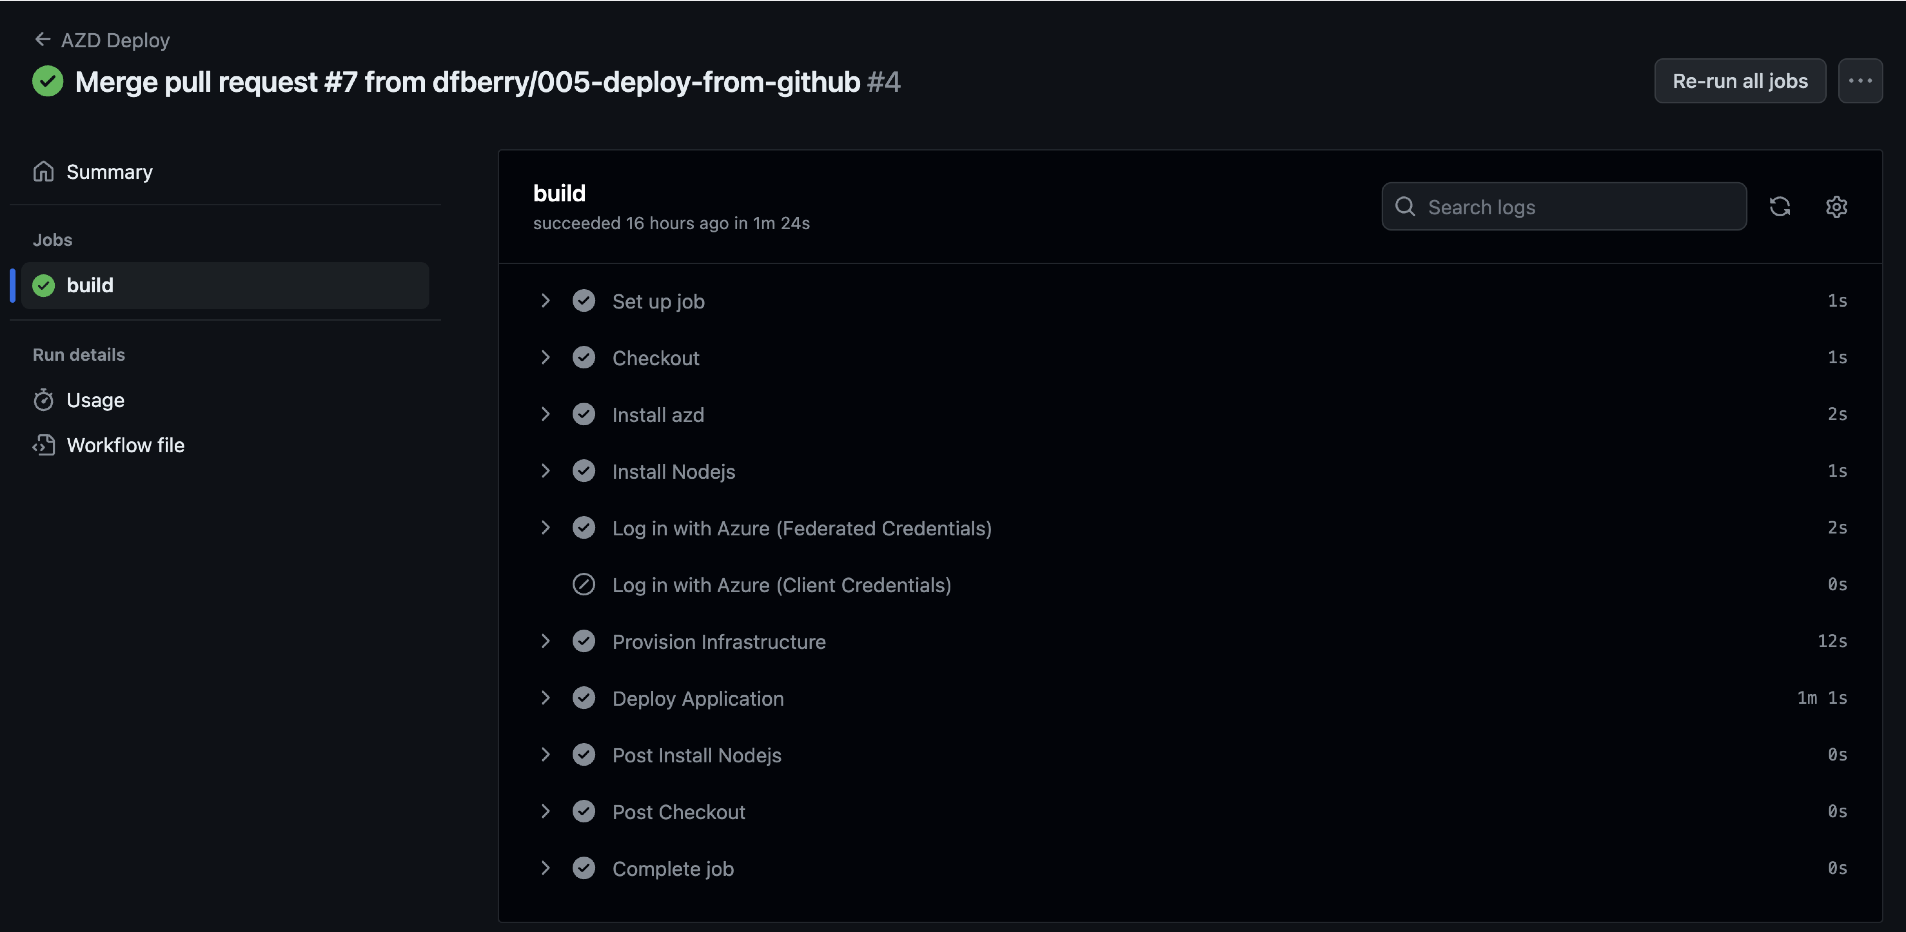
  2. Select the AZD Deploy for that commit to understand it is the same deployment as the local deployment. Continue to drill into the action until you see the individual steps.

    Browser screenshot of action steps for deploying from GitHub to Azure from Azure Developer CLI

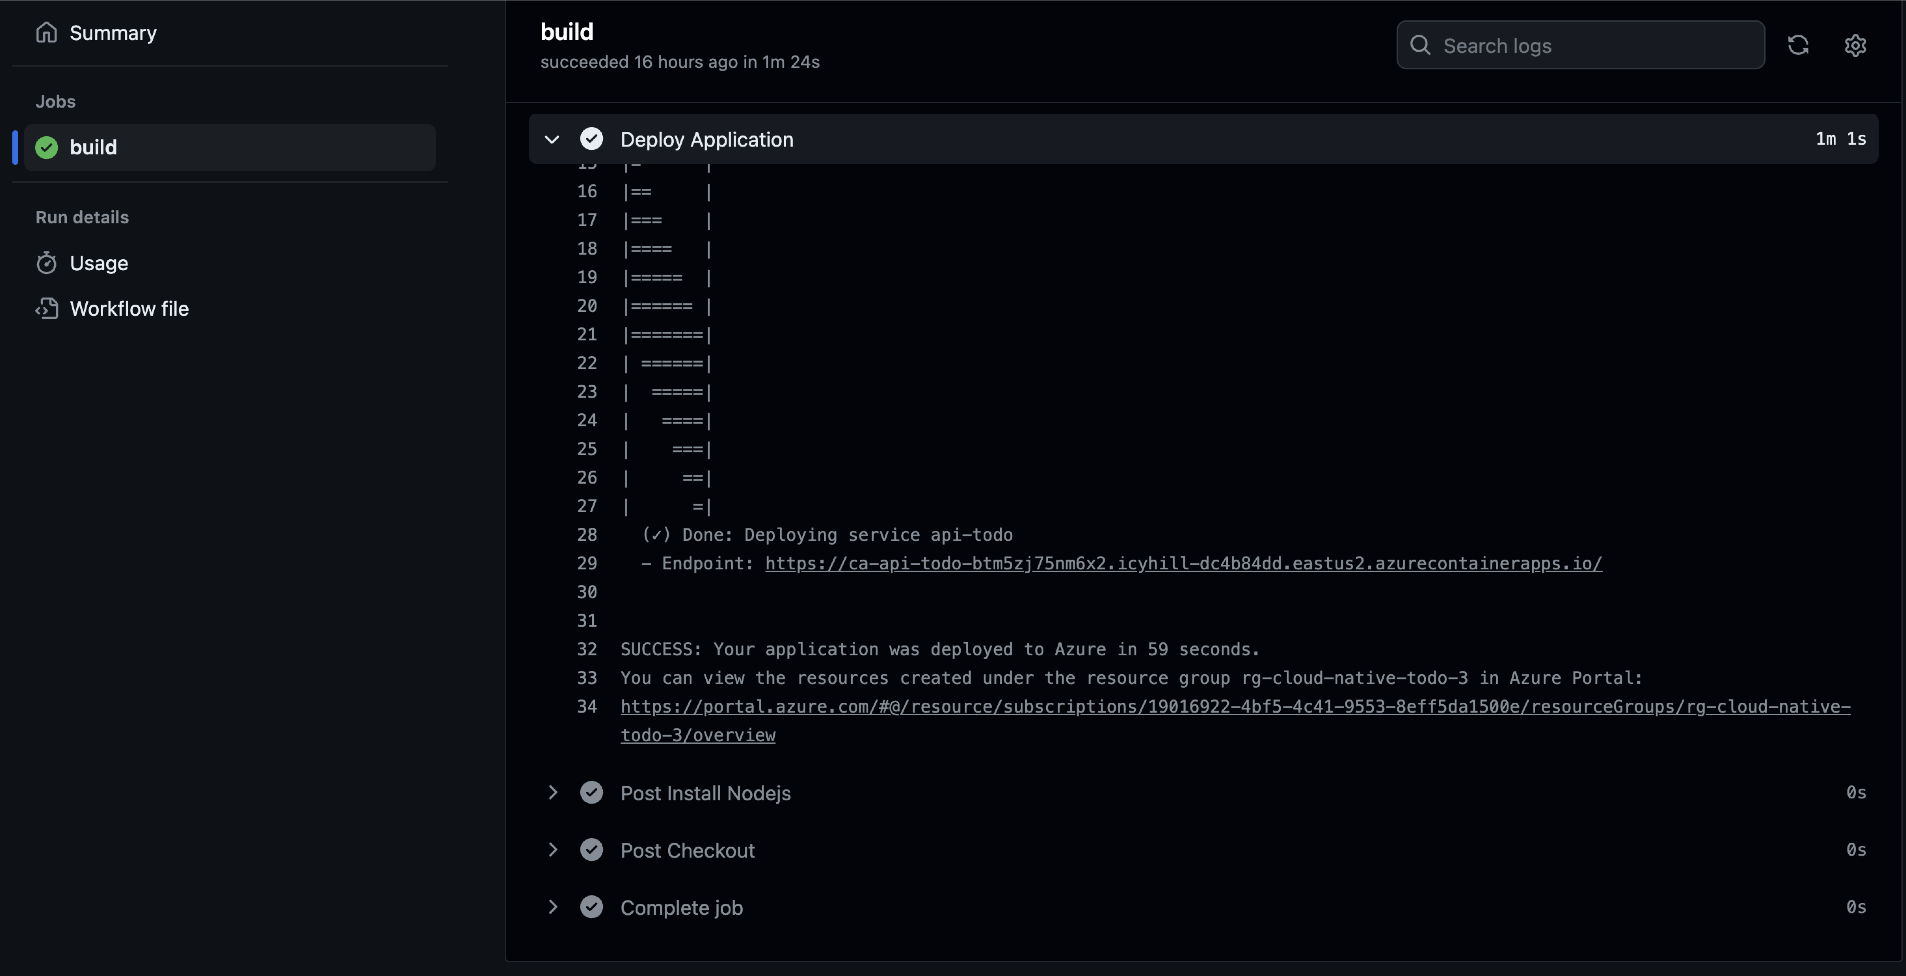
  3. Select the Deploy Application step and scroll to the bottom of that step. It shows the same deployed endpoint for the api-todo as the deployment from my local computer.

    Browser screenshot of Deploy Application step in GitHub action results

  4. Open the endpoint in a browser to see the updated version.

    Browser screenshot of updated application api-todo with new version number 1.0.2

Deployment from source code works

This application can now deploy the API app from source code with Azure Developer CLI.

Tips

After some trial and error, here are the tips I would suggest for this process:

  • Add a meaningful name to the azure-dev.yml. You will have several actions eventually, make sure the name of the deployment action is short and distinct.
  • Run azd pipeline config with the --principal-name switch in order to have a meaningful name.

Summary

This was an easy process for such an easy project. I'm interested to see how the infrastructure as code experience changes and the project changes.

· 10 min read

This fourth iteration of my cloud-native project, https://github.com/dfberry/cloud-native-todo, added the steps of creating the cloud resources (provisioning) and pushing code to those resources (deployment).

Diagram showing local and cloud areas with actions of provision and deployment between them.

For this cloud-native project, I knew there would be a Docker image of the project in a registry but I wasn't sure of the fastest steps to create the image from the repository, push it to the registry or how it was pulled into the hosting environment. The authentication part to push to a registry and from which tool is usually what takes a minute or two. Anything that improved that auth flow would be welcome.

Sticking with tools I know to go as fast as possible, I used Azure Developer CLI for the infrastructure.

Install Azure Developer CLI as a dev container feature in Visual Studio Code

Installation of Azure Developer CLI into dev containers is easy with a feature. Find the feature and add it to the ./.devcontainer/devcontainer.json.

// Features to add to the dev container. More info: https://containers.dev/features.
"features": {
"ghcr.io/azure/azure-dev/azd:latest": {}
},

Use the Visual Studio Code command palette to select Dev Containers: Rebuild and reopen in container. Check the version of the Azure Developer CLI installed with the following command:

azd version

The response:

azd version 1.5.0 (commit 012ae734904e0c376ce5074605a6d0d3f05789ee)

Create the infrastructure code with Azure Developer CLI

I've done most of this work before in other projects. I didn't really expect to learn anything new. However, GitHub Universe 2023 and Microsoft Ignite 2023 both took place between iteration 003 and my start on this iteration, 004. While I still used Copilot Chat as my pair programming buddy, I also leaned into any new feature I heard of from these two industry conferences. The Azure Developer CLI's azd init feature had an update (version 1.50) and I wanted to see what it would do. It asked Copilot Chat a couple of questions then it created the required files and folders. It took hours of Bicep development and compressed it into 30 seconds. Amazing!!!

Screenshot of Visual Studio Code using azd init to create infrastructure of project.

Did it correctly configure the infrastructure for this project? Yes. When I add a second app to this project, further down the road, I'll rerun azd init in a new branch.

The azd init process created a ./next-steps.md which was a huge help in validation.

Screenshot of Visual Studio Code displaying next steps file

Get cloud resource environment variables from Azure Developer CLI

The next steps covered environment variables because your project may need access to cloud resource secrets, connection strings, resource names, database names, and other settings created during provisioning to complete deployment tests. Azure Developer CLI gives you access this list of environment variables with azd env get-values to create your own .env file for your project.

I created a Bash script to get those values so I could test the endpoint.

#!/bin/bash
# Usage: <script> <path-for-env-file>
# Example: ./scripts/postdeploy.sh "./api-todo-test"
echo "postdeploy.sh"

set -x

echo "Getting param 1"
ENV_PATH="$1/.env" || ".env"
echo "ENV_PATH: $ENV_PATH"

echo "Remove old .env file"
rm -f $ENV_PATH

echo "Getting values from azd"
azd env get-values > $ENV_PATH

# Check if the .env exists
if [ ! -f "$ENV_PATH" ]; then
echo "*** .env file not found at $1"
exit 1
fi

# Run the npm test command
echo "Run test at $1"
cd "$1" && npm test

echo "Test completed"
exit 0

This script is called in the ./azure.yaml file in the post deployment hook:

postdeploy: 
shell: sh
run: |
echo "***** Root postdeploy"
./scripts/postdeploy.sh "./api-todo-test"

Develop containers for cloud-native apps

When I tried to use Azure Developer CLI to provision the project with azd up, the provision failed because the CLI couldn't find the tools in the environment to build and push the image to the Azure Container Registy.

Screenshot of Visual Studio Code terminal displaying result of azd up as docker tools are missing

While Docker isn't specifically required to run Azure Developer CLI, it's logical to assume if I intend to create images, I need the tools to do that. Copilot advised me to create a new Dockerfile for the dev container. This would have added another level of complexity and maintenance. Instead, I chose to use a dev container feature for docker-in-docker which leaves that complexity to the owner of the feature.

Fix for dev container won't start

I love Docker and I love dev containers but occasionally containers just don't start and the error messages are so low-level that they generally aren't helpful. The whole point of containers is that they consistently work but I develop on a Mac M1 and containers sometimes don't work well with M1.

When I added the docker-in-docker feature to the Visual Studio dev container and rebuilt the container, the container wouldn't start. I changed the configs and looked at the order of features, searched StackOverflow and GitHub and chatted with Copilot. Nothing helped. Using Visual Studio Code to rebuild the dev container without the cache didn't fix it either. Which is when I knew it was my environment.

The fix was to stop the dev container, delete all containers, images, and volumes associated with the dev container and start over completely. I didn't have any other projects in dev containers so I removed everything.

# Delete all containers
docker rm -f $(docker ps -a -q)

# Delete all images
docker rmi -f $(docker images -a -q)

# Delete all volumes
docker volume rm $(docker volume ls -q)

Deploy Express.js container image to Azure

Restart the dev container and the dev container started. At this point, I tried to provision again with azd up (provision & deploy) which succeeded. It's impressive how the services just work together without me having to figure out how to pass integration information around.

Screenshot of Visual Studio Code with successful deployment

Then I tried the endpoint for the API which is shown at the end of the output when azd up is done. I didn't get my project from the endpoint. The "Hello World" for containers responded at the endpoint which meant provisioning worked but deployment failed.

Find container image deployment error in Azure portal deployment log

The Azure resource group, the logical unit for all the resources in the infrastructure, has a deployment log. The Container App showed a failed status. The code is still a very simple Express.js app so the issue had to also be simple. I checked the deployment logs in the Azure portal and found the app's start script pointed to the wrong file.

Azure portal Container App deployment revision error

Following the error to the log shows the issue that the start file is incorrect.

Azure portal Container App logs

A quick fix to the Dockerfile.

# Wrong cmd
CMD [ "pm2-runtime", "start", "server.js" ]

# Correct cmd
CMD [ "pm2-runtime", "start", "dist/start.js" ]

Then azd up and the correct endpoint worked.

Add a version header to source code

While testing the deployment, I wanted to add versioning to the app so I knew changes to the project were displayed at the endpoint. The root request returns the version found in the ./api-todo/package.json, and the APIs return a x-api-version header with the value.

// eslint-disable-next-line @typescript-eslint/ban-ts-comment
// @ts-ignore: Ignoring TS6059 as we want to import version from package.json
import { version } from '../../package.json';

export function setVersionHeader(_, res, next) {
res.setHeader('x-api-version', version);
next();
}

The curl request returns the header when using --verbose.

Visual Studio code terminal with curl request showing x-api-version header displaying version 1.0.1

Add Playwright test to validate API

When I added playwright to the dev container and rebuilt the dev container, the container started but Playwright and its dependencies took up too much room. I increased the size of my container and limited by testing to Chrome. I also added the installation in the ./.devcontainer/post-create-command.sh script. By adding the installation here, when the container opens, I can see if it has enough room for a big dependency like Playwright and its browsers.

# ./.devcontainer/post-create-command.sh

#! /bin/bash
sudo apt-get clean
sudo apt update
npm i -g npm@latest
npm install
chmod -R +x ./scripts
npx playwright install --with-deps
echo "Node version" && node -v
echo "NPM version" && npm -v
echo "Git version" && git -v
echo "Docker version" && docker --version

The Playwright for the API tests the new header and the returned array of todos.

import { test, expect } from '@playwright/test';
import dotenv from 'dotenv';
dotenv.config();

const API_URL = process.env.API_TODO_URL || 'http://localhost:3000';
console.log('API_URL', API_URL);

import { version } from '../../api-todo/package.json';

test.use({
ignoreHTTPSErrors: true, // in case your certificate isn't properly signed
baseURL: API_URL,
extraHTTPHeaders: {
'Accept': 'application/vnd.github.v3+json',
// Add authorization token to all requests.
'Authorization': `token ${process.env.API_TOKEN}`,
}
});
test('should get all todos', async ({ request }) => {
const response = await request.get(`/todo`);
expect(response.ok()).toBeTruthy();

// Validate the x-api-version header
const headers = response.headers();
expect(headers).toHaveProperty('x-api-version');
expect(headers['x-api-version']).toEqual(version);


// Validate the response body
const todos = await response.json();
expect(Array.isArray(todos)).toBeTruthy();
expect(todos.length).toEqual(3);
});

Run the test from the workspace with npm run test --workspace=api-todo-test and see the test succeeded.

Screenshot of Visual Studio Code terminal with Playwright test results

Most fun - time savings

The best part about this project is the tooling. I can spend less time and enjoy that time more.

Cartoonish image of a clock

Currently Copilot shines with technologies that have a lot of Internet coverage including docs and troubleshooting. For this particular iteration, the only place Copilot didn't help was the annoying Docker issue when the dev container wouldn't start after adding the docker-in-docker dev container feature.

Wish list item #1 - azd test

While Azure Developer CLI provided provisioning and deployment, it didn't add testing. This seems like a natural next step for the project. It knows what the stack is because it created the infrastructure to support it. And it knows the endpoints because it displays them at the end of the deployment. Adding API tests seems within the tool's ability someday.

Wist list item #2 - docker-in-docker

Since the infrastructure required containers and the environment had the .devcontainer folder, adding docker-in-docker as a dev container feature is probably something Azure Developer CLI can fix in the future...perhaps a YAML snippet for the dev container feature in the ./next-steps.md:

"features": {
"ghcr.io/azure/azure-dev/azd:latest": {},
"ghcr.io/devcontainers/features/docker-in-docker:1":{}
},

Tips

There were a few things I found useful that I use moving forward in my development in the Tips list.

Results for 004 - create resources and deploy code

Once again Copilot saved a lot of time but it took backseat to the amazing work Azure Developer CLI provided with the entire DevOps flow. And notice there wasn't any auth flow for the Container registry to deal with when pushing images. That was all wrapped up in the Azure Developer CLI auth. Another time saver.